Tuesday, April 24, 2012

Working with Type/Midterm Due May 2

Week 4: Working with Type 

Lecture:
•    Downloading free fonts (dafont.com) •    Use of Type in Photoshop •    Text Effects •    Rasterizing Type
•    Preparing a new file in preparation for print
•    Converting to correct Color Profiles for Printing

Lab:
•    Using techniques of type from lecture, begin your promo card. We will photograph and scan your personal work in class together.


HW/ Midterm Assignment due next week (Due Week 5 which is May 2nd):
Create a Professional Promo 2 sided card that features at least one of your photos/artworks and has your contact info.
Bring a digital copy of the promo card to class next week (saved as a TIFF with layers), and bring 2 copies of the double sided final print on cardstock (approx 5x7” in size)

Reading: Classroom in a Book Section 7, starting on pg 187

***
Filling Text with an Image:
Open image that you want to fill with text. I chose this watercolor pattern:

Hit "T" for text tool on your keyboard. Click once then start typing.
Adjust the font size and type to cover the area of the image you want to fill the font.
Rasterize type layer by control clicking on type layer.
Use magic wand and click on type (Make sure the contiguous box at the top is not checked)
While the selection is live (ants are running) click on the image layer.


Copy (command C) then Paste (command V).
You now have a new layer of text filled with the imagery which you can paste onto another document.


Text with Texture:

Wacom Tablets


Adobe Photoshop is specifically designed to be used with a Wacom pen tablet. Pen pressure, pen tilt, and even the airbrush's finger-wheel can control attributes like opacity, size, color, and exposure. With a Wacom pen, you have the power to dynamically control Photoshop's tools in the most natural and intuitive way possible.

Photoshop has more than 20 customizable tools that perform at their best with a Wacom pen. Simply press a little harder or softer with your pen for more or less effect. Photoshop feels every slight adjustment that you make with your Wacom pen.

Photographers, designers, and artists choose to work with Wacom pen tablets because Photoshop Quick Masks and Layer Masks are designed to be used with a Wacom pressure-sensitive pen. Color temperature, exposure, blur, and any other Photoshop effect can be applied with pressure-sensitive pen control. To selectively undo the effect, simply turn your pen over and use the pressure-sensitive eraser. Whether making selections, retouching, or applying effects, working with a Wacom pen is clearly the fastest way to work to achieve a smoother, more natural look.

For more info go to: http://www.wacom.com/tips/photoshop.cfm

For tips & a tutorial on how to use the wacom pen plus pen tool to do a composite, go to http://www.wacom.com/tips/tip.cfm?ID=91&STEP=5&category=Photoshop

To buy one, click here.

History


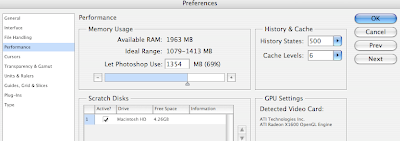
Just a reminder that you can change the amount of steps recorded in your history palatte, up to 1000 (instead of the regular 20)

Go to Photoshop > Preferences > Performance > History > Caches, then type a larger number (perhaps 500?) into "History States".