Wednesday, May 2, 2012

Compositing Artists


Some photographers use compositing in their art work. Are they photographers, photo illustrators, artists or all of the above?

Peter Funch
The photo below is by Peter Funch of Times Square. It's a stunning example of composite photography, or multiple photos taken over time that have been digitally combined.


Tom Mason


Jeff Liao (different areas of Queens)
http://www.digitalphotopro.com/profiles/jeff-liao-broadway-to-queens.html


Julia Fullerton-Batten
 does NOT actually use Photoshop to make composites, but rather uses elaborate sets and removes crash pads, strings, etc in photoshop with the clone tool. This is something one could do in Photoshop, however. If you were to attempt this, and whenever making a composite, make sure that the lighting, color temperature and shadows in both the subject and the background match.

Week 5: Selection Tools

 Selection tools help us select one area and copy it to a new area, also called compositing.

A COMPOSITE is made when images are "cut out" and combined to create a new image. Selection tools (like the Marquee, lasso, magic wand, and pen tools) help us to cut images out.

Class Outline:

Lecture:
  • Lasso, Marquee, Magic Wand
  • Pen Tool and Paths
  • Intro to Compositing, Refine Edge, Feathering a selection
Lab:
  •  Create a path using the pen tool exercise on the transfer drive
  • Create a composite using the Marquee, lasso, magic wand, and pen tools

HW:  Create a composite using the pen tool. Cut something out and put it in a new environment. Try to choose something that has hard edges (fur/hair/people is more advanced). Be sure to name your path and save as a tiff with layers.
Reading: Classroom in a Book Section 3, starting on pg 68

Example Blog that uses compositing to create collages: Image below by Mrs. Lillien Styling House www.blog.mrslilien.com
In Class Exercise (files are on transfer drive):
Use the Pen tool to cut something out and paste a new background behind it. In this case we are pasting a white background behind this dancer.


Step 1: Open the raw or hi-res file.
Step 2: Using the pen tool, zoom into at least 300 percent and outline the figure. At the end make sure you close the path. Go to Paths palatte and double click "working path" and name it something else to save the path.
Step 3: Make a new layer on top of the background layer. EDIT > FILL with white
Step 4: Go to path, click on it, then make the path a selection by clicking the dotted circle icon at the bottom of the paths palatte. Should look like this:

Step 5: When the selection is live, feather it 2 pixels to soften edges (SELECT > MODIFY>FEATHER). Then make a mask by clicking the "add layer mask" button on bottom of layers palatte. Invert mask (command i).
Step 6: You can paint back with black on the mask with a low opacity brush to bring back a bit of the shadows around the feet to make it look more realistic.


Midterm Grading Criteria: 100 possible Points (making up 15% of your total grade)

15pts: on time

35pts: effort/creativity/thoughtful design

25pts: Digital Copy has layers with text and imagery

25pts: Printed Copy followed directions (approx. 5x7”, 2 copies, printed double sided, includes contact info, includes imagery and text)

Tuesday, April 24, 2012

Working with Type/Midterm Due May 2

Week 4: Working with Type 

Lecture:
•    Downloading free fonts (dafont.com) •    Use of Type in Photoshop •    Text Effects •    Rasterizing Type
•    Preparing a new file in preparation for print
•    Converting to correct Color Profiles for Printing

Lab:
•    Using techniques of type from lecture, begin your promo card. We will photograph and scan your personal work in class together.


HW/ Midterm Assignment due next week (Due Week 5 which is May 2nd):
Create a Professional Promo 2 sided card that features at least one of your photos/artworks and has your contact info.
Bring a digital copy of the promo card to class next week (saved as a TIFF with layers), and bring 2 copies of the double sided final print on cardstock (approx 5x7” in size)

Reading: Classroom in a Book Section 7, starting on pg 187

***
Filling Text with an Image:
Open image that you want to fill with text. I chose this watercolor pattern:

Hit "T" for text tool on your keyboard. Click once then start typing.
Adjust the font size and type to cover the area of the image you want to fill the font.
Rasterize type layer by control clicking on type layer.
Use magic wand and click on type (Make sure the contiguous box at the top is not checked)
While the selection is live (ants are running) click on the image layer.


Copy (command C) then Paste (command V).
You now have a new layer of text filled with the imagery which you can paste onto another document.


Text with Texture:

Wacom Tablets


Adobe Photoshop is specifically designed to be used with a Wacom pen tablet. Pen pressure, pen tilt, and even the airbrush's finger-wheel can control attributes like opacity, size, color, and exposure. With a Wacom pen, you have the power to dynamically control Photoshop's tools in the most natural and intuitive way possible.

Photoshop has more than 20 customizable tools that perform at their best with a Wacom pen. Simply press a little harder or softer with your pen for more or less effect. Photoshop feels every slight adjustment that you make with your Wacom pen.

Photographers, designers, and artists choose to work with Wacom pen tablets because Photoshop Quick Masks and Layer Masks are designed to be used with a Wacom pressure-sensitive pen. Color temperature, exposure, blur, and any other Photoshop effect can be applied with pressure-sensitive pen control. To selectively undo the effect, simply turn your pen over and use the pressure-sensitive eraser. Whether making selections, retouching, or applying effects, working with a Wacom pen is clearly the fastest way to work to achieve a smoother, more natural look.

For more info go to: http://www.wacom.com/tips/photoshop.cfm

For tips & a tutorial on how to use the wacom pen plus pen tool to do a composite, go to http://www.wacom.com/tips/tip.cfm?ID=91&STEP=5&category=Photoshop

To buy one, click here.

History


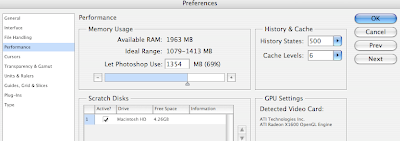
Just a reminder that you can change the amount of steps recorded in your history palatte, up to 1000 (instead of the regular 20)

Go to Photoshop > Preferences > Performance > History > Caches, then type a larger number (perhaps 500?) into "History States".

Wednesday, April 18, 2012

Basic Tips for Taking Pictures

Week 3: Masking and Adjustment Layers

Class Outline

Lecture:
•    Basics of Masking, creating layer masks
•    What are Adjustment layers?
•    Focus on Curves, Hue/Saturation, Levels
•    Dodge (brighten) and Burn (darken) using curves (lighting corrections)
•    Painting on masks with hard and soft brushes and using a gradient on a mask.
•    Double Processing Camera Raw
•    Sharpening Masks

Lab:
•    In class exercise includes usage of curves adjustment masking, sharpening and layer masks

Homework Due Next Week (Due Apr 25th)
1. Bring in something to scan next week, plus examples of your own artwork.

2. Turn in a TIFF that has 3 adjustment layers: one “S” curve layer, one “dodge” curves layer
and one “burn” curves layer.
3. Required Reading: Classroom in a Book Section 9 (pgs 228-247)

What is a MASK?


Organizing your Layers:
It's important that you separate your layers into groups (by making folders), separating color corrections from retouching and separating pixel layers from adjustment layers. Remember to always put new layers on top as you work. Here is an example of what an organized file looks like:


Sharpening:
 
Open Image from Camera Raw into Photoshop

Duplicate Background Layer

Go to FILTER > OTHER > HIGHPASS. Choose a radius of 2 pixels.
       
Now, on the layers palatte, change the blending mode of your new “Sharpening Layer”  from “NORMAL” to “OVERLAY”

If this is too sharp, lower the layer opacity. If it’s not sharp enough, duplicate this layer or repeat the process with a number higher that 2.

Make a layer mask and invert the mask (Command i). The mask should be black. Paint with a soft white brush on the areas you wish to sharpen.

**Example below: Only the face has been sharpened (as you can see, the mask was inverted and white was painted over the face to reveal the sharpened effect hiding underneath)

You can Dodge (Brighten) and Burn (Darken) using Curves and Masking: